MK02-01 – Obstacle Avoidance Car
About Course
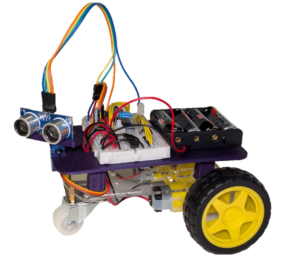
In this course, you will learn how to build, wire, and program a robot car from scratch (step-by-step)! This car will drive around avoiding obstacles all on its own. It’s the perfect project to tackle the STEM trifecta; mechanics, electronics, and programming. Unlike many robotics kits, this is not plug-and-play. We’re designing and wiring all our own circuits!
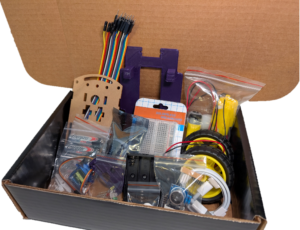
You’ll receive the kit by mail, and follow along with video tutorials that explain the concepts and then build the kit with you. This course is taught by a professional engineer (and certified industrial robot programmer) with degrees in both mechanical engineering and computer science, who has been working as a factory automation equipment designer for nearly a decade. We’ll walk you through everything you need to build your very first robot, even if you have absolutely zero previous experience!
Recommended for ages 8+. You must have a laptop with a USB-C port (or an adapter, sold separately).
The account with which you purchase this kit will be the account used to access the online video content.
Teachers – contact us for educator pricing.
What Will You Learn?
- Programming
- Electrical Circuits & Components
- Ultrasonic Distance Sensors
- Servo Motors
- DC Motor Control
- Battery Packs
- Autonomous Logic
- Analog vs Digital Electrical Signals
Course Content
Introduction
A basic overview of how to navigate the course.
-
Welcome
02:42
Basic Circuits
Learn about the basics of electricity and how circuits are built. Design different circuits to make LEDs light up, and explore the various tactile inputs available to us like buttons, toggles and switches.
-
How Electricity Works
10:42 -
Electrical Circuit Basics
12:49 -
How a Breadboard Works
15:42 -
Using a Battery Pack as a Power Source
03:26 -
Lighting Up an LED I
07:52 -
Lighting Up an LED II
06:48 -
Momentary Buttons I
04:57 -
Momentary Buttons II
04:00 -
Maintained Buttons I
09:28 -
Maintained Buttons II
08:45
Programming Basics
Adding a microcontroller to our circuit allows us to write programs that will automate various actions. Modify your LED circuit to allow the controller to turn our LED on and off for us automatically without the use of buttons.
-
Attaching your Microcontroller to your Breadboard
04:46 -
Installing Arduino IDE
05:03 -
Configuring Arduino IDE for your Microcontroller
04:40 -
Using your Microcontroller as a Power Source
04:49 -
LED Circuit Powered by our Microcontroller
06:23 -
Turning an LED On and Off with our Microcontroller
14:50 -
Making an LED Blink
09:48 -
Adding Buttons to our Blinking LED Circuit
02:26 -
Using Multiple GPIO Pins with Multiple LEDs
10:42
Intermediate Programming
Organize your programs to make them more powerful by including custom functions. Build a circuit and use these new tools to control more complex components such as a 7-segment display.
-
7-Segment Displays
02:54 -
7-Segment Display Circuit Build I
12:47 -
7-Segment Display Circuit Build II
06:25 -
7-Segment Display Circuit Build III
07:23 -
7-Segment Display Program Setup
06:17 -
Writing Custom Functions
10:17 -
Creating Functions for Each Number
14:11 -
Counting on a 7-Segment Display
08:38
Advanced Programming
Adding some more programming tools to allow us to interact with different kinds of components. Using global variables, conditional statements, custom function arguments and loops will allow us to create more complex circuits and explore the difference between digital and analog components such as an RGB LED.
-
RGB LEDs
14:50 -
RGB LED Circuit
08:55 -
Global Variables
13:31 -
Custom Function Arguments
11:39 -
Conditional Statements (IF)
15:00 -
Local Iterative Loops (FOR)
14:19
Basic Inputs
Learn to receive and interpret input signals to your microcontroller so that it can interact with its environment. Using buttons for physical inputs will allow us to add another layer of automation and interact with our robot. We'll use the momentary button to control the value on our 7-segment display.
-
Modified 7-Segment Display Circuit with Button I
07:43 -
Modified 7-Segment Display Circuit with Button II
04:48 -
Modified 7-Segment Display Circuit with Button III
06:27 -
Using a Button to Update the 7-Segment Display Value
19:38
DC Motors
Some components require more power than others. Learn to create circuits for more power-hungry components like motors, and the associated programming techniques we need to control these components.
-
How a DC Motor Works
03:48 -
H-Bridge Circuits
12:26 -
DC Motor Control Program
10:16 -
Dual DC Motor Circuit
06:56 -
Dual DC Motor Control Program
06:21 -
Vehicle Drive Control Program
10:25
Ultrasonic Distance Sensors
Learn about sound waves and how they propagate. We'll use an ultrasonic sensor to measure the distance to the nearest object by measuring the time it takes for a sound pulse to echo back to our robot. Write the program to control our sensor and wire the necessary circuit.
-
How Ultrasonic Distance Sensors Work
11:10 -
Ultrasonic Distance Sensor Circuit
05:21 -
Ultrasonic Distance Sensor Program
18:38 -
Using the Serial Monitor
11:07 -
Combining Inputs & Outputs
16:30
Servomotor Control
Unlike DC motors, servomotors can be sent to a specific position. We'll use these motors to control the direction that our distance sensor is facing. Learn to wire a servomotor circuit and write the program to tell it which direction to face.
-
How a Servomotor Works
04:13 -
Servomotor Circuit
12:29 -
Servomotor Control Program
12:52
Car Kit Build
Assemble the chassis for our car that will serve as the platform for all our components. Mount the breadboard with our circuit, the servomotor, ultrasonic sensor, battery pack and wheels onto our car. Use the battery pack for power.
-
Assembling the Chassis I
03:42 -
Assembling the Chassis II
04:02 -
Assembling the Chassis III
04:13 -
Assembling the Chassis IV
04:52 -
Assembling the Chassis V
01:47 -
Adding the Riser & Servomotor
05:18 -
Mounting the Breadboard & Battery Pack
02:30 -
Mounting the Ultrasonic Sensor
04:53
The Final Circuit
Combine everything we have learned about ultrasonic distance sensors, DC motors, servomotors and LEDs into our final car circuit. Add in a maintain button to turn our car on or off.
-
Adding the DC Motors
17:30 -
Adding the Ultrasonic Sensor
08:38 -
Adding the Servomotor
06:32 -
Adding the RGB LED
10:49 -
Adding the Battery Pack
07:58
Obstacle Avoidance Programming Logic 1
Add all the basic functionality to control all the components connected to our car. Set up the global variables and custom functions for our motors and sensors, and make sure everything is initialized based on the wiring of our circuit.
-
Setup of Global Variables for all Components
10:49 -
Initialization of all GPIO Pins
09:12 -
Setup of Custom Functions
18:50
Obstacle Avoidance Programming Logic 2
Write the main logic tree that will allow our robot to make decisions about how it will navigate. Fine tune and test the various parameters to make it drive around without hitting anything.
-
Writing the Main Logic Tree I
14:26 -
Writing the Main Logic Tree II
10:34 -
Writing the Main Logic Tree III
10:24 -
Writing the Main Logic Tree IV
19:27 -
Deploying and Testing the Robot
09:07
Housekeeping
Some optional final steps for cleaning up our completed project.
-
Housekeeping
05:40